7.2 Design Thinking
Now that you know a bit about design, it's time to get familiar with design thinking. This term means something a bit more specific than thinking about design. Developed at the Stanford design school (or as it is known, the D School), design thinking is an approach (and iterative process) to identifying and solving the problems that people experience.
Being able to discuss design thinking and use its concepts is very useful for aspiring PMs. Not only can it help you do your job, but it is also an incredibly popular concept among tech companies and other organizations.
By the end of this checkpoint, you should be able to do the following:
- Describe design thinking principles and key terms
- Use design thinking tools and processes to find solutions to user problems
What is design thinking?
Design thinking is an approach to thinking through problems and iteratively finding solutions. It is commonly used in the product discovery and design phases because its methodology often surfaces insights that would be missed by more traditional or linear problem-solving approaches. Design thinking is designed to force you and your team to question assumptions and dig into problems for subtle contributing factors or ambiguous root causes. Design thinking drives user-centricity—the idea that your product needs to solve the real problems your users have, not the ones you imagine or assume they have.
A basic intro to design thinking in a product lifecycle by Stanford Business School
There are five phases of design thinking:
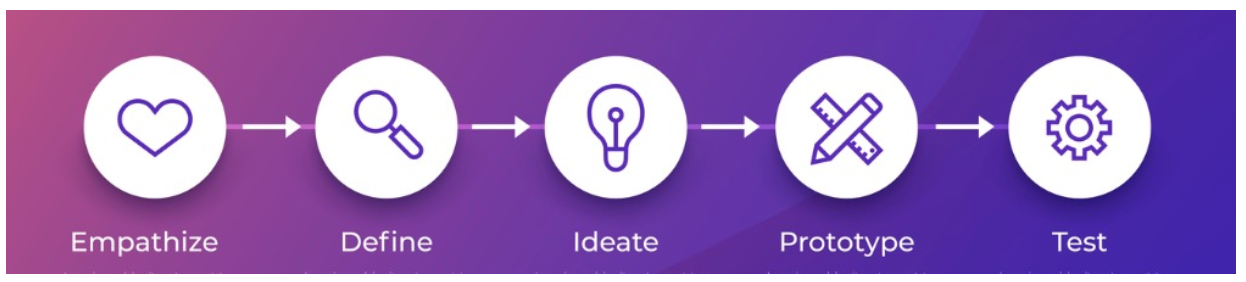
Empathize
The empathize stage requires learning about your users and understanding their problems, desires, pain points, and goals. Having empathy makes you truly user-centric. What your users are thinking and feeling throughout their engagement with your product will tell you what the product needs to do (or what it shouldn't do) to serve them best.
Define
The goal of this phase is to define a problem statement from the perspective of the user, not from your perspective. Putting that empathy to use, your team should make a statement that incorporates the challenges your users are facing when using your product.
Ideate
With a solid problem statement in place, the ideation phase is centered around imagining creative solutions. This phase needs to be totally boundless and judgment-free. There are no bad ideas at this point. The most obvious or fitting solution may not be the right one. So the goal is to break through mental inhibitions and come up with many possible ideas.
Prototype
The leading ideas should be converted into low-cost, low-fidelity prototypes. Prototyping can help narrow down solutions further by demonstrating how well a solution works in practice, not in theory. Much like an MVP, a prototype helps to rapidly and at a low cost unearth the direction you need to go next.
Test
Next, you take your prototypes to potential users and see how well they solve their problems. As a truly user-centric PM, you always want to test your solutions with real users. Never assume that your understanding of your users and their problems is infallible—or that your solutions will always work. Users will often surprise you, and there is no better way to learn than to engage with them.
While there are five clear stages, design thinking is not a linear process; it's an iterative one. The arrows in the image above are, therefore, deceiving because once a prototype has been tested, you will go back to the ideation stage and continue to iterate and improve your solutions from there. Each phase can readily and fluidly move back into a previous phase. In this way, all the phases build on each other, feed into each other, and inform each other.
Double diamond process
The double diamond process was developed as the result of a study conducted by the British Design Council in 2005. Much like design thinking, it establishes four stages of the creative process and centers around repeatedly validating ideas in an iterative process. The stages are as follows.
Discover
This stage is about gathering as much data as possible to learn what problems your users face or what opportunities you have to serve them. This stage leverages various forms of data collection, like user testing or surveys.
Define
During this stage, the data gathered in the discover stage is sifted through and parred down. This includes analyzing the various problem statements to determine which ones are low-priority or a total waste that can be ruled out. The goal is to identify the problems or opportunities worth pursuing and to build a sort of case around them, backed up by the data.
Develop
Once you have the set of problems you should tackle, you and your team enter the develop stage. The goal is to build a stockpile of potential solutions to the problems you are targeting. One key here is to think outside the box—don't limit yourself or your team at this stage. It's more of a brainstorming exercise, so creative and innovative ideas should be encouraged, even if they seem too wild.
Deliver
This stage is all about sifting and parring down again. This time, however, you are sifting through potential solutions rather than through problems. Review each solution. Does it actually solve the problem? Does it introduce problems of its own? Is it something that could feasibly be built and delivered? Scrutinize the solutions and eliminate those that don't meet the standards.
These stages are mapped visually in this double diamond model:
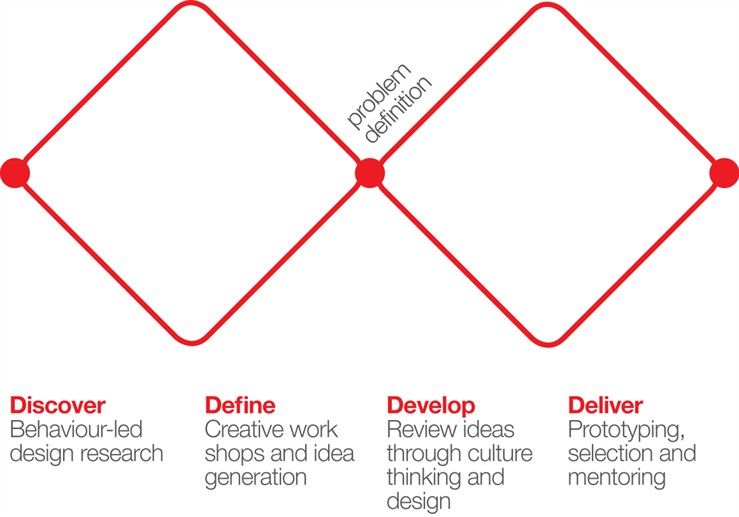
As you can see, the discover stage opens wide and diverges from the starting point to define a more expansive problem set. The define stage then converges that problem set back down to a singular, more focused problem set. This repeats in the dynamics between the develop and deliver stages. The develop stage diverges and expands to ideate a large number of possible solutions while the deliver stage again converges on a smaller, more focused set of solutions. The double diamond shape represents this diverging and converging process.
Design Thinking Tools
Design thinking and the double diamond are both frameworks that help you think about the process of product discovery. Next, you will learn about tools and exercises that will help you bring these principles into your day-to-day work.
Empathy mapping
An empathy map is a tool that can help you and your team organize your research and observations around your user. It is a simple tool that consists of four quadrants. Each quadrant focuses on one aspect of your users' interaction with your product (or similar products): what they said, did, thought, and felt.
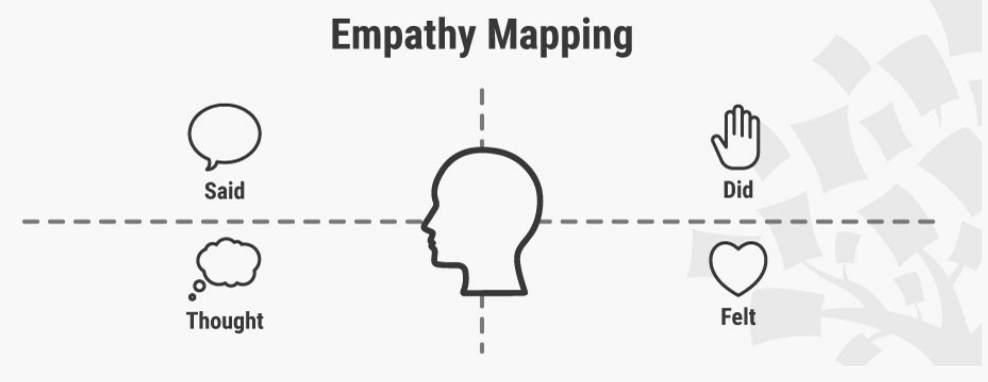
After conducting your interviews, observing usability tests, and administering surveys, you can gather all your notes and fill out the map. Mapping what users said and did will often be pretty easy, but you will have to dig deep to map out what users thought and felt.
It's important to capture the spectrum of thoughts and feelings that your users had throughout the interaction—not just a single overarching thought or feeling. For example, a user of Turbo Tax may start the process in a negative or anxious frame of mind—nobody likes doing their taxes. But, if the tool makes the anxiety-producing task easy and understandable, the user's mood may improve over the course of the process. Or vice versa. The user might end up in a worse mood because the tool made a difficult task even more frustrating. In either case, if you were the PM in charge of Turbo Tax, you would want to know.
Creating empathy maps is best done as a team, with everyone involved in user research. You can do the mapping using a whiteboard or by placing sticky notes on a wall. It may also be a tool your UX team uses and presents to you. Creating a map for each of your user personas can help your team establish strong problem statements. It can also keep you centered on the full range of your users' experiences.
Creating a point of view (user, need, and insight)
Having a clear, substantive, and actionable problem statement is an important foundation for ideation. It keeps you and your team focused. In design thinking, this kind of focused problem statement is called a point of view statement. Point of view (or POV) statements use a particular format to ensure that they meet all the criteria needed to make your process effective. They are divided into three elements: user, need, and insight. When each of these elements has the appropriate detail, a really valuable POV statement arises.
You can build a table to help organize the information. This is what it may look like:
| User | Need | Insight |
|---|---|---|
| New mother | Daily nutritious meals for up to four people that can be prepared with little to no effort | Health-conscious, but no time or energy for grocery shopping or cooking |
| Young professional | Nutritious quick and easy single-serving meals 2-3 times per week that require minimal effort | Health-conscious, but has a busy work schedule and would rather spend free time doing things besides cooking |
Once you have the information, you format it into statements:
A new mother needs nutritious meals for her family of four that can be prepared daily with little to no effort because she doesn't have the time or energy for grocery shopping and cooking but wants to continue to eat healthily.
A young professional needs quick and easy, nutritious, and low-effort meals for herself two to three times per week because she wants to eat healthily but works long hours and would rather spend her free time outside than in the kitchen.
You can document every user you talk to in this type of table. Then find recurring themes and condense individual users into groups whose needs and insights are similar. This can help you build better user personas and focus your attention on the main user segments of your audience, along with their needs and wishes.
Crazy 8's exercise
Once you've mapped your users' experiences and summarized them in clear problem statements or POV statements, it's time for the design thinking ideation stage. Your goal at this stage is to encourage your team to brainstorm a variety of ideas. Crazy 8's is a quick and simple exercise that can help you do that.
It works like this. Everyone gets a piece of paper and a pencil. Each person should fold the paper into eight sections. Then, you put a timer on for eight minutes, and everyone sketches eight different ideas to address a selected problem or POV statement. By the end of the eight minutes, each of the eight sections of the paper should be filled out with a solution idea. We're talking rough sketches—the goal for this exercise is coming up with a large quantity and diversity of ideas, not the perfect solution.
When the eight minutes are up, ask everyone to present all of their ideas. Then stick all of the papers up on a wall or board for voting. Ask participants to pick their three favorite ideas. If you have time, give participants another six to eight minutes to further develop those ideas. Then, vote between the three ideas. You can use stickers for the vote—each person gets three small stickers and can place them on the papers with their favorite ideas. If there's an idea they really like, they can put all three stickers on that single idea. If you want another ranking system, you can color code the stickers (such as green as the favorite and blue as the second favorite). Or just keep it simple and tally up the stickers to find the top ideas your team supports.
Prototyping tools
When your team has landed on a solution you feel confident about, it's time to prototype. Prototypes are often quick and rough, and they can take many forms. Sketched wireframes, mockups, or even slides that depict user flows and interactions are some common examples of early prototypes in digital product development.
However, prototyping can also be higher-fidelity. As your solution goes through more iterations, there may be a point at which you are ready to invest more in developing a working prototype that provides users with an interactive experience similar to what the product would do when fully developed. This can act as a solid proof of concept to put in front of users before actually investing developer time and coding a solution.
Working prototypes can be static mockups with clickable hotspots, or they may be flat, front-end code on a staging server. Some of the tools popular among UX designers to create higher-fidelity prototypes include InVision, Axure, Framer, Adobe Xd, and Sketch.
Design sprints
The design sprint, developed by Google Ventures, is a way to structure the stages of design thinking into a scheduled, intensive, five-day exercise. The goal is to quickly put a working prototype in front of real users in order to accelerate the feedback loop. This should not be confused with agile development sprints, which are set periods of time in which a development team accomplishes specific tasks. As a PM, you'll likely run development sprints with your team, and you'll learn more about that process later in this program.
Here is what each day of a design sprint will look like.
Day 1: Understanding the problem
On day one, the objective is to build a shared understanding of the problem, define what success looks like, account for risks, and create a map to reach success. During day one, subject matter experts (or SMEs) will review the user flow map you've created and provide insights and feedback. Your team will listen closely and write down all the questions and problems that they see users encountering in their journey through the flow. By the end of the day, your team will choose a problem to focus on for the design sprint.
Day 2: Finding a solution
Day two is sketch day—your team will ideate on solutions for the focus problems. The day two activities break the process of identifying and sketching solutions down into steps so that everyone on the team can contribute. No need to be an amazing artist. The Crazy 8's exercise outlined above is often part of the day two agenda.
Day 3: Deciding on a solution
The objective of day three is to choose which of the solutions sketched the previous day will move on to be prototyped. There are some structured ways that your team can come together to decide which solutions are the most promising. When you have decided on a solution, the next step is to build a storyboard, which is essentially a blueprint for prototyping the chosen solution. So, at the end of day three, you should have clarity on how to build a prototype to put in front of users. As a note, it is possible to decide that more than one solution should move into the prototyping stage. Keep in mind that you will need to storyboard all the solutions that you intend to prototype. You'll learn more about storyboarding in a later checkpoint.
Day 4: Prototyping
Day four is all about creating a prototype that can be put in front of real users for testing and feedback. The first step is to pick the right tools for prototyping, especially in the context of the timeline you have—a single day. You'll also want to give each person on the team a specific job. Google Ventures has identified some important roles to help structure the collaboration in the day four prototyping process.
Day 5: User testing
Day five will include five user interviews. Users will have an opportunity to interact with the prototype and answer some interview questions. You and your team will watch closely during the interviews, taking notes on what went well and what didn't go well. At the end of the day, all the notes and observations are gathered together, and patterns are identified. The final activity of the sprint is to establish next steps. Does the prototype you created have potential that should be refined and pursued further? Or was it an efficient failure, meaning you discovered (in a rapid, efficient way) that it shouldn't move forward at all?
The condensed process of the design sprint structures the design thinking process, while still reaping the benefits of its nuanced, non-linear approach.
Practice ✍️
It's time to practice your ability to use—and talk about—design thinking. To do so, you will try self answering this interview prompt: "Pitch me an idea you have to improve an existing product, and describe how you arrived at that idea." But you won't just answer the prompt. First, use a few of the design tools you learned about in this checkpoint and follow these steps below.
Choose a product (digital or not) that you can easily find at least three people to observe using. Doing this yourself is not a substitute. Remember that part of design thinking is getting into the thoughts and feelings of others.
Observe the users interacting with the product or interview them. Then complete an empathy map or point of view statement table to summarize what you learned.
Do a Crazy 8's exercise to generate ideas based on your problem statement.
Pick one of your eight sketches and spend some time elaborating on that solution.
Finally, record a brief pitch of yourself describing that solution and how you got to it (five minutes or less).
Create a shareable document and add it in your notebook/notion page, including all of the following in the box below:
- An empathy map or point of view statement summarizing your user research
- A Crazy 8's exercise page with all of your quickly generated solutions
- A link to the video of yourself pitching an idea