7.3 Storyboarding 🎯
This section includes an Activity 🎯
A user journey is essentially what it sounds like. It is the journey that your user is on when they engage your product and use it to reach a goal. In the discovery phase of a product, you will seek to understand the paths a user might take through your product to accomplish their goals. This understanding is foundational to your success as a PM.
It important for you to understand not only each of the steps and actions your user may take, but also what your user is thinking and feeling throughout their path. Journey mapping and storyboarding are two methods that help you capture all of this information and represent it in an easy-to-understand, visual format.
By the end of this checkpoint, you should be able to do the following:
- Create a journey map representing a user journey through a digital product
- Create a storyboard representing a user journey through a digital product
Journey mapping
A journey map plots out the user journey, including all the nuances of the user's thoughts and feelings. A complete journey map generally includes some form of all the following data points.
- The stages a user passes through when using your product. These may just be descriptive, such as "Stage 1: Browsing products." However, it's better to include simple sketches of each phase, along with the description.
- The goals of your user at each stage.
- The actions the user takes, sometimes with notes about the environment or context they are in.
- The user's thoughts.
- The user's feelings—these are often simply expressed with words like "frustrated," "worried," or "confident." Sometimes the feelings are indicated by emojis of some kind, like happy or sad faces.
- Opportunities, ideas, and recommendations.
Example journey map
Review Spotify's journey map below. What do you notice?
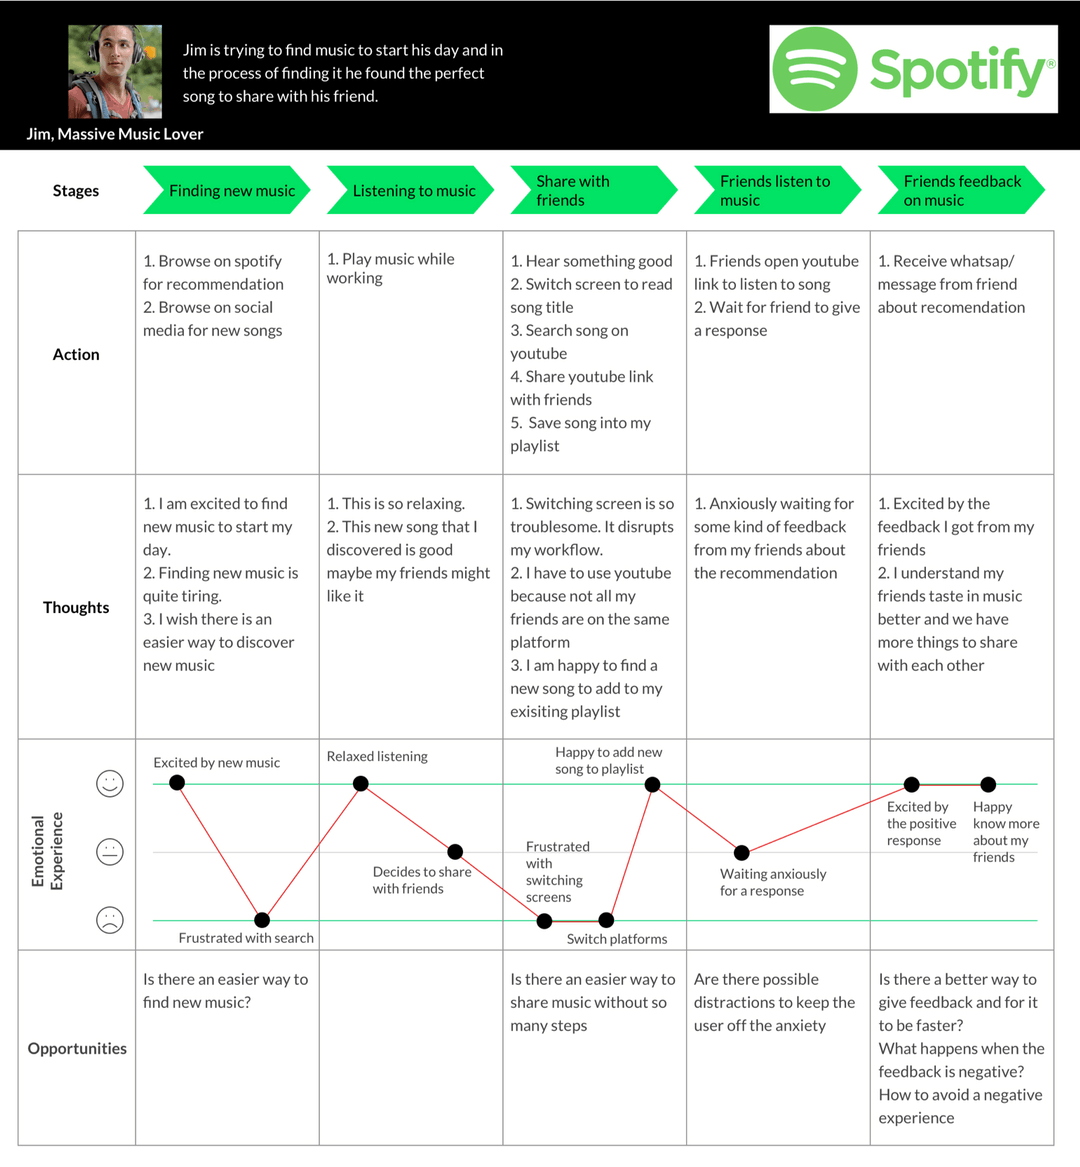
You can see how comprehensive a journey map can be. You'll also notice how the data is presented in an empathetic way. This tool is all about emotion and how a user feels using a product, not just about how they interact with it.
Visualization is key to the value journey mapping provides. With so many data points and inputs that need to be considered and communicated, a visual representation that presents these inputs in an orderly, intuitive way through a multi-step process simplifies the information overload.
Problems and challenges that a user encounters surface quickly in a journey map. Sketches and drawings bring greater clarity to interfaces, processes, and scenarios. However, these should stay simple and low-fidelity. Avoid getting into the weeds of the design details. The focus should stay on the journey, the user, and the opportunities.
Storyboarding
Storyboarding is a technique originally used in film and media to break down large, complex stories into basic narrative building blocks. It has been adopted by PMs to accomplish the same goal of building a simple, visual narrative about a user and their engagement with a product.
Storyboards are generally low-fidelity sketches that depict the story of a typical user, most often one of your main target personas. Each sketch generally also includes a few sentences that set the context and reveal the persona's thoughts and feelings. In fact, storyboards are essentially a more narrative, visual representation of a journey map. They include most of the same information, but they are structured as a story rather than as a set of data points.
Storyboarding is valuable because it gives more context to a journey and leverages storytelling to create greater empathy. Storyboarding also establishes a stronger shared understanding across your team. In fact, in many cases, storyboarding is a better option than flowcharts for these very reasons: greater context, greater empathy, and greater shared understanding.
The 3 S's of storyboarding
One framework for storyboarding focuses on covering the 3 S's: setting, sequence, and satisfaction. In order for storyboarding to be effective, it has to include all 3 S's.
Setting
The setting of the story is the context in which the story unfolds. This starts with the who of the story and some key details about your persona. It also includes the environment in which your persona encounters your product and the reason for that encounter. In other words, the setting includes the task that they are trying to accomplish or the goal that your product is helping them achieve.
Sequence
What sequence of steps will your user take once they encounter your product? This includes the steps they need to take to find your product, as well as the steps they need to take to use your product. How do they get from needing a solution to identifying your product as a solution to their problem? The storyboard should engage with and answer these questions.
Satisfaction
In order to understand what will satisfy your user, you need to understand their underlying motivation or need, as well as the end result they are pursuing. Another important element of satisfaction is retention. What is going to ensure that your users continue to view your product as the solution to their problem whenever the problem returns?
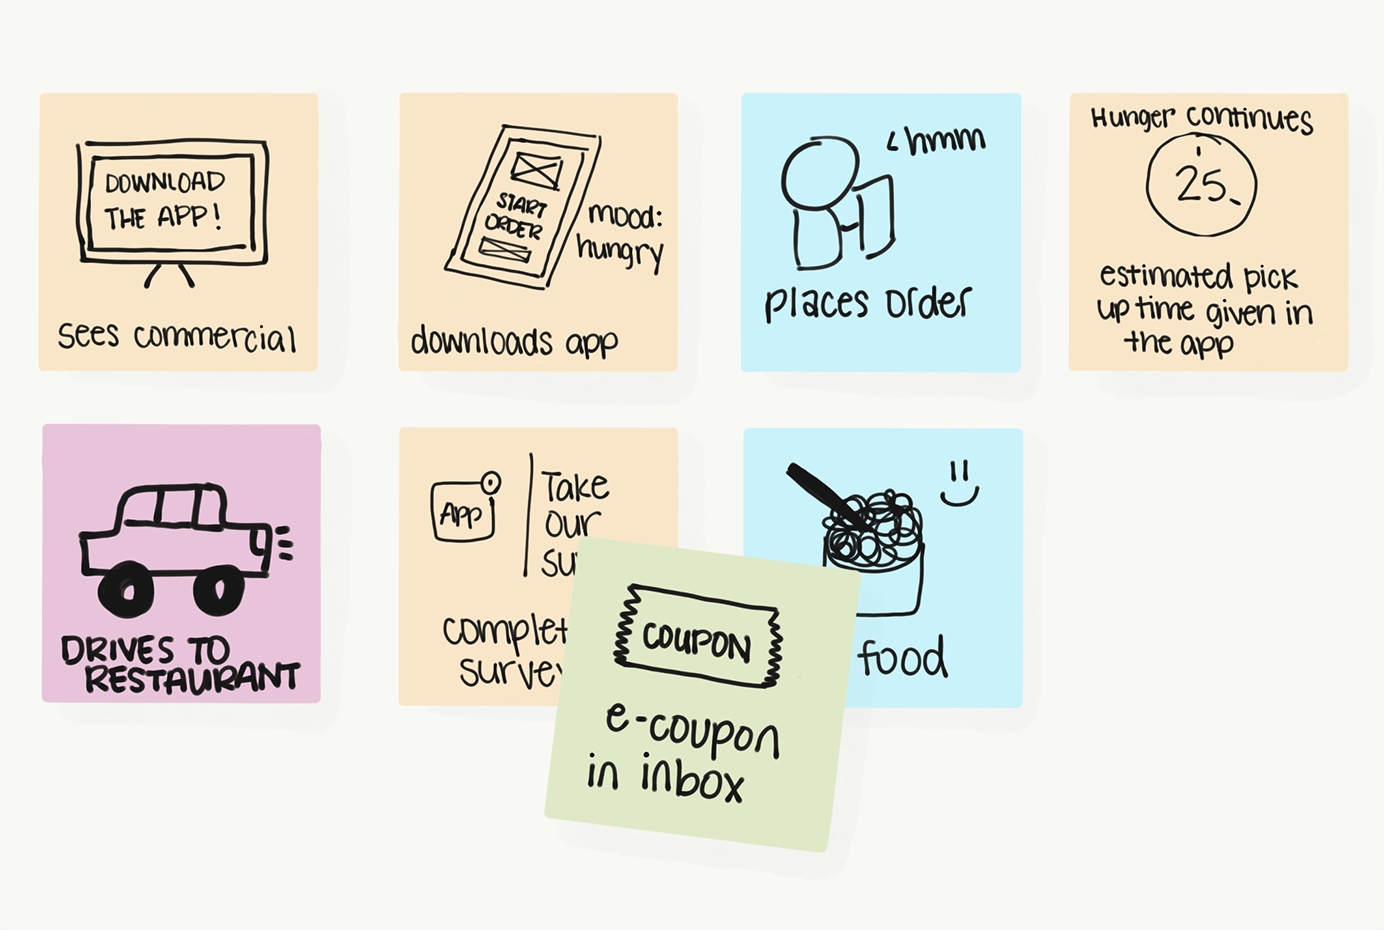
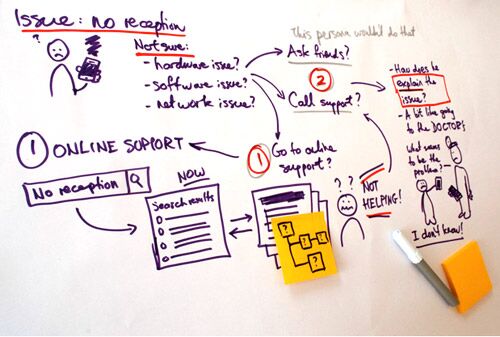
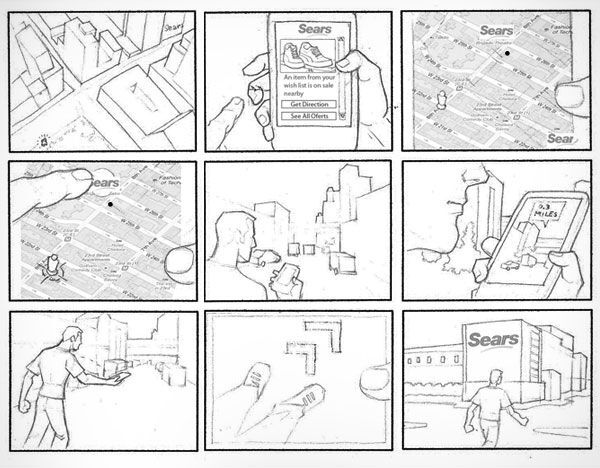
Example storyboards
Below are some examples of the UX storyboarding process. Note that each team, and even each designer, may have their own way of visualizing user flows and user journeys.
Activity 🎯
Practice creating journey maps by completing the following activity. This activity is from UX/UI Open and they were kind enough to share their activity with us.
Your first design cycle
Consider the user experience of ordering fast food through a drive-through. If you've never done this, find someone in your life who has and ask about it.
Discover: Create a simple journey map in Figma, starting with the moment that the user turns into the drive-through parking lot until the time that they drive away. Follow these steps:
Examine the example provided below.
Open Figma and log in to your account. (If you haven't already, sign up for your free education subscription now.)
Use a template from here to create a simple journey map. (Don't worry—you are not required to do any styling like in the example.)
- List at least three expectations about the experience that a user might have before they begin.
- Imagine the entire process that the user would go through. List as many steps as you can think of, making sure that there are at least seven.
- Group the steps into as many meaningful phases as you think are appropriate.
- Add at least one example of what your user might be thinking or feeling during each phase. Write the examples from the user's perspective, like "Should I get a whole meal or just a hamburger?" or "I wonder if I can find a closer drive-through?"
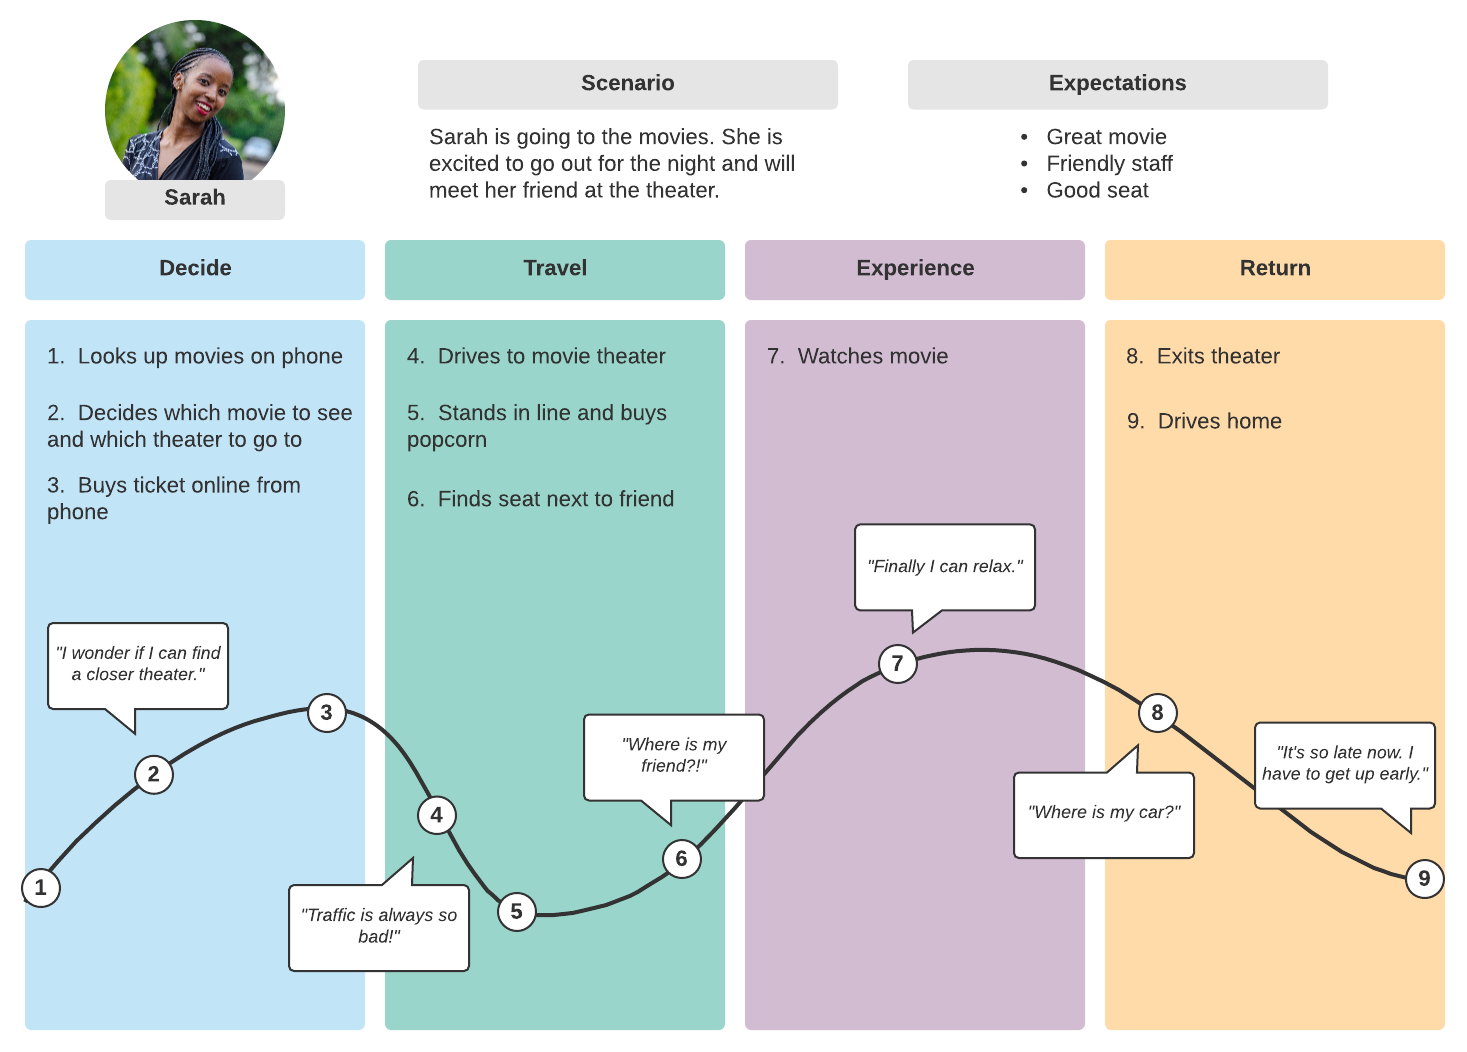 Image source: Lucid Chart
Bonus exercise
Define: Use a rose, bud, and thorn chart to identify things in the user experience that are going well (roses), things that might be opportunities to add more delight (buds), and things that are pain points (thorns). Follow these steps:
- In Figma, make a copy of your journey map.
- Review the Lyft example below. Instead of using traditional sticky notes, try using virtual sticky notes with Figma's Notes Templates.
- List out all the thorns that you can imagine the user encountering at the drive-through. Come up with at least four.
- List all the roses. Come up with at least four.
- List all the potential buds. What could be added that would delight users? Come up with at least two buds. Remember that this should not be about exploring solutions to thorns yet.
- Group together any ideas that seem to have a similar theme.
- Choose one thorn or cluster of thorns, and write it out as a problem statement.
Example: Lyft could use the rose, bud, and thorn exercise to produce the diagram shown below. Lyft is a ride-sharing app, where drivers sign up to use their own cars as taxis. Riders use the app to request a ride with a specific pick-up location and destination, and then riders and drivers are matched by proximity and availability. Riders and drivers can both rate each other; if their ratings are too low, they risk not being able to use the app.
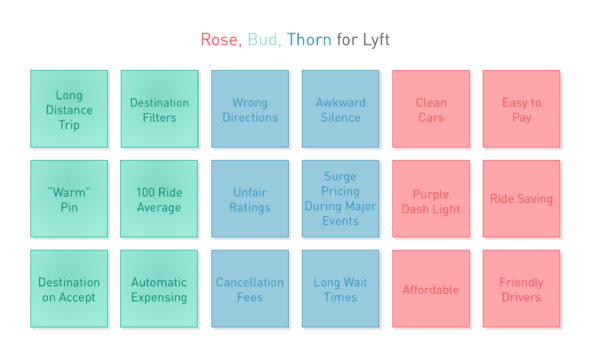
Image source: Atomic Object
Develop: In your design journal, brainstorm a list of possible solutions to the problem that you identified. Follow these steps:
- Set a timer for three minutes.
- List any solutions you can imagine. There are no constraints (yet), so be daring and list every possible solution—even if the idea seems wacky, too expensive, too difficult, or otherwise hard to accomplish. The goal is to keep writing continuously for the full three minutes.
Deliver: Write a proposal for a solution. To do this, answer the following prompts in your design journal:
Describe the problem that you are solving and explain why it's an important problem to solve. Take the perspective of the drive-through owners, who are your prospective clients.
- Why should they care?
- How will solving this problem help their businesses?
Explain the pros and cons of two solutions that you didn't use, and make a case for why they are not the best options.
Explain the pros and cons of the solution that you did choose, and make a case for why the owners should move forward with this option.
Submission
First. Write a short medium article on your work. Writing and showcasing your work in public is the best way to cath others attention.
It doesn't need to be perfect. It can be short but assume that your recruiters would also read that. You can use AI or ChatGPT to get hints and formats for your medium article on this project. Upload for figma file in the medium article and write a few words about it and your experience and learnings from the project.
Don't forget to mention that this is an activity from PMcademy and also tag the link pmcademy.com